Growing & Seeds · Growing
Should You Soak or Pre-Sprout Wheatgrass Seeds Before Planting?
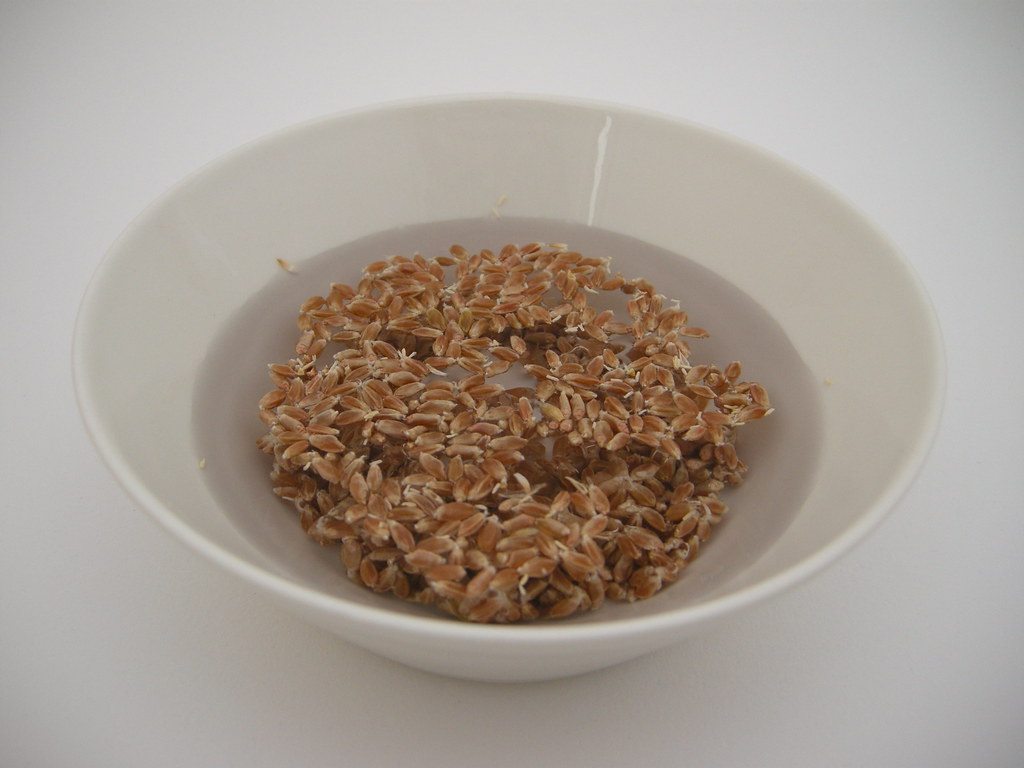
You do not have to soak wheatgrass seeds before planting, but soaking is often a useful way to give them a faster start. Dry seeds can be sown directly into a properly moistened, well-drained growing medium.
For many home setups, a practical method is to:
- Rinse the seeds.
- Soak them in clean water for approximately 8–12 hours.
- Drain and rinse them thoroughly.
- Plant them immediately, or continue pre-sprouting until a small white root appears.
- Plant promptly once the root is visible.
This overnight soaking and planting approach is consistent with practical wheatgrass-growing guidance from Oregon State University Extension, but the timing should be treated as a starting range rather than a universal requirement.
Pre-sprouting is optional. It does not mean leaving seeds underwater for a longer period. After the initial soak, the seeds should remain moist and aerated—not submerged.
The main potential benefit is a faster start to early germination. Soaking does not guarantee a higher final germination rate, a larger harvest, or more nutritious wheatgrass.
Soaking, Pre-Sprouting, and Direct Sowing Compared
| Method | What happens | Best suited to | Main caution |
|---|---|---|---|
| Direct sowing | Dry seeds are planted into evenly moist growing medium | The simplest workflow | The tray must stay moist without becoming waterlogged |
| Soak and plant | Seeds are soaked, drained, rinsed, and planted | A straightforward option for many growers | Do not leave seeds submerged after soaking |
| Soak and pre-sprout | Seeds are soaked, drained, rinsed, and held moist until a small root appears | Growers who want a visible head start | Plant before roots become long or tangled |
All three methods can be reasonable. Direct sowing reduces handling, while soaking and pre-sprouting let you begin the germination process before planting.
Why Soak Wheatgrass Seeds?
Water starts the germination process
A dry seed begins germination by absorbing water. This initial uptake is called imbibition. Once hydrated, the seed can begin the internal processes involved in germination. Penn State Extension explains imbibition and other basic seed-germination processes.
Water is only one requirement, however. Seeds also need oxygen and suitable environmental conditions. Keeping seeds constantly submerged is therefore not the same as providing ideal germination conditions.
Soaking is best understood as a hydration step, not a cleansing, detoxifying, or nutritional treatment.
Soaking may speed early germination
Research on agricultural wheat has found that water soaking can shorten the time required for early germination under tested conditions. Research on wheat seed priming has reported faster early performance under particular soaking conditions, including an overnight-style treatment. Harris et al. and Tanwar et al. provide examples of this type of wheat-seed research.
That finding is relevant to wheat seed behavior, but it is not a direct guarantee for every home wheatgrass tray. Agricultural wheat studies and dense tray-grown wheatgrass involve different growing conditions.
Soaking may help viable seeds begin emerging sooner, but it does not necessarily increase the final percentage of seeds that germinate. It also cannot compensate for damaged or nonviable seed.
How Long Should Wheatgrass Seeds Soak?
For many home setups, begin with an overnight soak of approximately 8–12 hours.
Use clean, potable water and enough water for the seeds to become fully hydrated. After soaking:
- Drain the water completely.
- Rinse the seeds with fresh water.
- Either plant them immediately or begin the pre-sprouting stage.
- Do not leave the seeds sitting in stagnant water.
Instructions vary somewhat. Some growing guides recommend shorter periods, while others use an overnight range. The appropriate response can depend on the seed lot, seed size, temperature, water volume, and whether you want to hydrate the seeds or wait for a visible root.
Is a 24-hour soak too long?
A 24-hour soak should not be the default method. Longer soaking is not automatically more effective, and wheat hydropriming research has found that seed performance can decline at longer durations under some conditions. Tanwar et al. examined how soaking time and water volume affected wheat seed performance.
This does not mean that every 24-hour soak will ruin every batch. It means that extending the soak indefinitely provides no reliable advantage. After an overnight soak, drain the seeds and continue with a moist, aerated pre-sprouting stage if needed.
How to Pre-Sprout Wheatgrass Seeds Before Planting
Pre-sprouting means allowing the seeds to begin germinating before placing them in the growing tray. The process involves an initial soak followed by drained, moist holding periods. Practical wheatgrass and microgreen guidance supports keeping seeds moist while avoiding excessive standing water. See Oregon State University Extension and Penn State Extension’s microgreens guide.
Step 1: Rinse the seeds
Place the wheatgrass seeds in a clean container and rinse them with potable water. Start with clean hands, a clean container, and clean tools.
Rinsing can remove loose debris, but it should not be treated as sterilization or as a guarantee that the seeds are free from microorganisms.
Step 2: Soak for approximately 8–12 hours
Cover the seeds with clean water and allow them to soak overnight.
Treat this as a practical starting range rather than an exact requirement. The goal is to hydrate the seeds without leaving them submerged unnecessarily long.
Step 3: Drain completely
After the initial soak, drain the seeds thoroughly. Do not leave them sitting in a pool of water while waiting for roots to appear.
The seeds need moisture, but they also need access to air. Good drainage helps avoid stagnant conditions.
Step 4: Rinse with fresh water
Rinse the hydrated seeds with fresh water, then drain them again. Do not continue using old soak water.
At this stage, the seeds should be damp but not submerged.
Step 5: Hold the seeds in a clean, aerated container
Keep the drained seeds in a clean container where excess water can escape and air can circulate. Avoid standing water and tightly packed, waterlogged conditions.
The goal is to keep the seeds moist while allowing air to reach them.
Step 6: Rinse and drain periodically
Continue rinsing and draining the seeds at regular intervals, such as every 8–12 hours, until the first small white root appears.
The timing will vary. Some seeds may show a root relatively soon after soaking, while others may take longer.
Step 7: Plant when the first small root appears
The practical planting point is when a short white root, sometimes called a tail, is just visible.
Do not wait for long, tangled roots or green shoots. Plant the seeds promptly in the prepared growing medium and keep the tray evenly moist without creating standing water.
When Should You Skip Pre-Sprouting?
Direct sowing may be the better choice when:
- You want the simplest possible workflow.
- Handling wet seeds is inconvenient.
- You can keep the growing medium evenly moist.
- The tray drains well.
- You prefer to avoid transferring fragile sprouted seeds.
- You do not need to see a root before planting.
Direct sowing is an acceptable method for wheatgrass. The seeds can absorb water and begin germinating after they are placed in moist growing medium.
The tradeoff is that you have less visible information about germination progress. Pre-sprouting lets you see a root before planting, but it adds handling steps and another stage where cleanliness and moisture need to be managed.
Common Mistakes When Soaking or Pre-Sprouting Wheatgrass Seeds
1. Soaking for too long
A longer soak is not automatically a better soak. Avoid leaving seeds submerged for 24 hours or several days as a routine method.
2. Leaving seeds underwater after the initial soak
Pre-sprouting requires moisture and oxygen. Drain the seeds after soaking and keep them moist without submerging them.
3. Failing to drain thoroughly
Excess water can create stagnant conditions and reduce access to oxygen. Drain the seeds after every rinse. Guidance on growing microgreens also emphasizes moisture control and avoiding waterlogged conditions. Penn State Extension.
4. Planting after the roots become long and tangled
Plant when the first small white root appears. Waiting too long can make the seeds more difficult to spread and handle.
5. Using dirty containers or tools
Dirty jars, trays, strainers, hands, or other tools can introduce contamination. Clean equipment before beginning and avoid containers with residue from previous batches.
6. Overwatering the growing medium
The medium should be damp, not saturated. Standing water and poor drainage can create conditions favorable to decay and mold.
7. Using a tray with poor drainage
A tray that cannot release excess water makes moisture control more difficult. Use a setup that allows excess water to drain away rather than collect around the seeds.
8. Planting too densely
A crowded layer of wet seeds can hold moisture against itself and restrict airflow. Use an appropriate amount of seed for the tray instead of assuming that more seed will always produce more grass.
9. Assuming soaking guarantees germination
Soaking may help viable seeds begin germinating sooner, but it cannot compensate for poor seed quality or guarantee a perfect stand.
10. Assuming soaking prevents mold
There is no reliable basis for treating soaking as a mold-prevention method. Mold control depends more directly on clean equipment, moisture management, drainage, airflow, planting density, and seed quality.
11. Treating rinsing as sterilization
Rinsing can remove debris and refresh the seeds, but it does not make raw wheatgrass completely free from microbial risk.
12. Assuming pre-sprouting guarantees more grass or better nutrition
Pre-sprouting may provide a practical head start, but the available evidence does not establish that it guarantees a higher final yield or greater nutritional value in a home wheatgrass tray.
Hygiene and Food-Safety Considerations
Sprouting and early germination require moisture and time. Those same conditions can support microbial growth if contaminated seed, water, hands, containers, or trays are involved.
For a cleaner process:
- Wash your hands before handling the seeds.
- Use clean containers, trays, strainers, and tools.
- Use potable water.
- Rinse with fresh water rather than reusing stagnant soak water.
- Drain the seeds thoroughly after soaking and rinsing.
- Avoid warm, stagnant, waterlogged conditions.
- Keep the growing medium damp but not saturated.
- Clean food-contact surfaces before use.
These practices are consistent with general sanitation principles described in FDA guidance for commercial sprout operations. That guidance is primarily written for covered commercial operations, not as a complete rulebook for ordinary home growers.
As a conservative practical food-safety precaution, discard a batch if it develops visible mold, slimy growth, or a distinctly foul or otherwise off odor. These signs are not a wheatgrass-specific diagnostic test, and an odor or texture change cannot identify the specific cause. Do not try to rescue visibly spoiled material by rinsing it.
Raw or minimally processed plant products can carry microbial risks. The cited CDC outbreak example involves alfalfa sprouts, while the broader food-safety guidance is not specific to wheatgrass. Wheatgrass-specific risk should therefore not be overstated.
FDA sprout guidance is written primarily for covered commercial sprout operations. It is not a complete rulebook for ordinary home growers. However, its sanitation principles—clean food-contact surfaces, appropriate water handling, and contamination control—are useful when preparing seeds at home.
Regardless of the seed’s labeling, continue to follow the hygiene and moisture-control practices described above.
Which Method Should You Choose?
Choose direct sowing if simplicity is your priority
Direct sowing avoids the extra container, rinsing, and seed-handling steps involved in pre-sprouting. It can work when you can maintain consistent moisture and good drainage in the tray.
Choose soak-and-plant as a middle-ground method
Soak the seeds overnight, drain and rinse them, then plant them without waiting for a visible root. This provides a hydration period without requiring a separate pre-sprouting stage.
Choose pre-sprouting if you want to see a head start
Pre-sprouting is useful if you want to confirm that the seeds have begun germinating before planting. Stop when the first small white root appears, and plant promptly.
Do not choose a longer soak simply because it seems more thorough
The goal is not to keep the seeds underwater for as long as possible. A practical process is to hydrate the seeds, drain them, keep them moist and aerated, and plant them at the first-root stage if you are pre-sprouting.
Overall, soaking is helpful but optional. Pre-sprouting is also optional. Drainage, airflow, sanitation, and moisture control are important parts of the process regardless of which seed-preparation method you choose.
Frequently Asked Questions
Research & Further Reading
Authoritative sources
- Oregon State University Extension, Directions for How to Grow a Wheatgrass Pet Pal:
- Utah State University Extension, Get Your Easter Grass Growing!:
- Penn State Extension, A Step-By-Step Guide for Growing Microgreens at Home:
- Penn State Extension, Seed and Seedling Biology:
- Tanwar et al., Optimization of ‘on farm’ hydropriming conditions in wheat: Soaking time and water volume have interactive effects on seed performance, PLOS One:
- Harris et al., Participatory evaluation by farmers of on-farm seed priming in wheat in India, Nepal and Pakistan, Experimental Agriculture:
- U.S. Food and Drug Administration, Guidance for Industry: Standards for the Growing, Harvesting, Packing, and Holding of Sprouts for Human Consumption:
- U.S. Food and Drug Administration, 2023 Final Guidance: Standards for the Growing, Harvesting, Packing, and Holding of Sprouts for Human Consumption:
- Centers for Disease Control and Prevention, Outbreak of Salmonella serotype Kottbus Infections Associated with Eating Alfalfa Sprouts:
- Supplemental practical growing source, not a scientific or food-safety authority, SproutPeople, Wheatgrass Growing Instructions:
Andi’s Way company and product information
The following sources provide company, product, or process information. They are not scientific, medical, nutritional, or food-safety evidence.
- Andi’s Way, Organic Wheat Seed for Growing Wheatgrass—Hard Red Winter Wheat:
- Andi’s Way, Growing Trays—10×20 Flats With or Without Drain Holes:
- Andi’s Way, How to Grow Wheatgrass Successfully at Home:
Related guides
How to Bottom-Water Microgreens Without Waterlogging the Tray
Learn how to bottom-water microgreens with nested trays, moisture checks, drain-off steps, and practical tips to avoid soggy media and standing water.
12 min read
Best Growing Medium for Microgreens: Soil vs Coco Coir vs Grow Mats
Compare potting mix, coco coir, and grow mats for microgreens. Learn the trade-offs in watering, cleanup, crop support, reuse, tray setup, and food safety.
16 min read
Do Microgreens Regrow After Cutting?
Most microgreens are a one-time harvest. Learn why some shoots may regrow after cutting, how baby greens differ, and when reseeding is the better choice.
8 min read
Stay in the loop
New guides, when they publish
An occasional email when a new guide goes live. No spam.
Your email is stored privately for future guide updates. No emails are being sent yet. Privacy policy