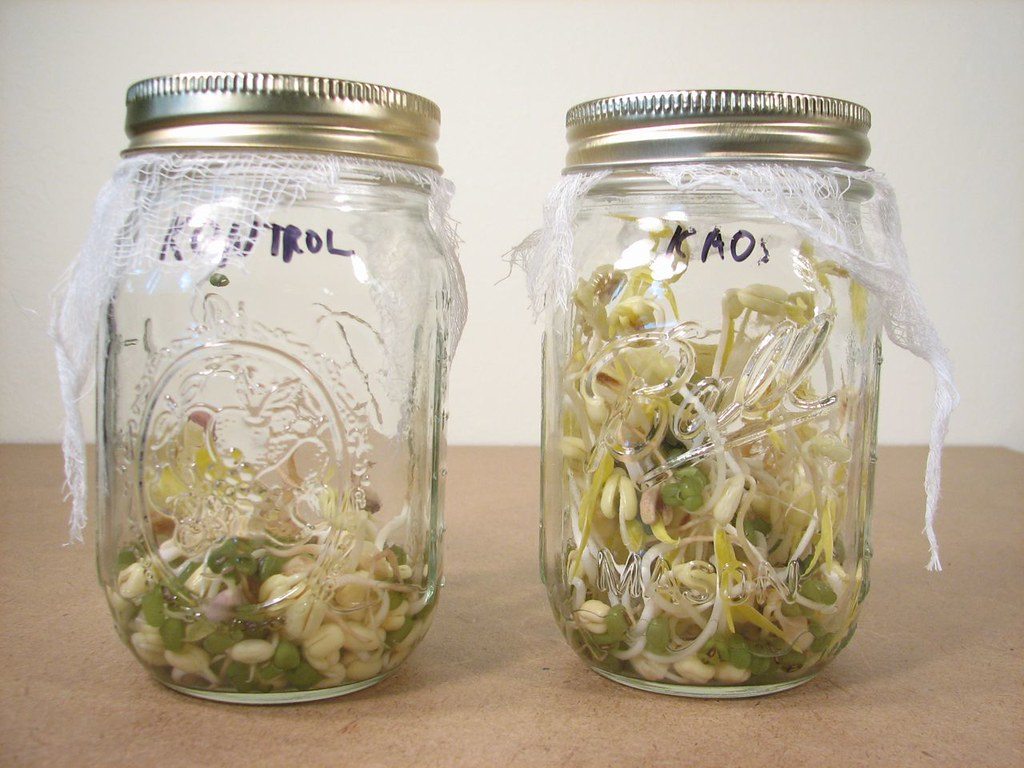
To grow mung bean sprouts at home, choose whole, intact mung beans sold for food use or specifically for sprouting. Rinse and sort them, soak them in room-temperature water for about 6–12 hours or overnight, then drain them thoroughly. Place the beans in a clean wide-mouth jar with a breathable mesh or cheesecloth cover. Keep the jar warm, dark, and well drained, and rinse and drain the beans two to four times daily.
Most batches are ready to harvest in roughly 3–7 days, depending on temperature, seed quality, and the size you prefer. Home-sprouting guidance from NC State Extension, Nebraska Extension, and Oregon State University describes similar soak, rinse, drainage, and harvest practices.
These steps support good growing conditions, but they do not eliminate food-safety risk. The warm, wet environment that helps seeds germinate can also support harmful bacteria. Raw or lightly cooked sprouts may be risky, particularly for pregnant people, young children, older adults, and people with weakened immune systems. See guidance from the FDA, CDC, and FoodSafety.gov.
What You Need to Grow Mung Bean Sprouts
A basic jar method does not require soil, fertilizer, or grow lights. You need:
- Whole mung beans intended for food use or sprouting
- A clean, wide-mouth jar or suitable sprouting container
- A mesh sprouting lid, cheesecloth, or another breathable screened cover
- Clean, room-temperature water
- A clean bowl or tray to catch drips
- A way to position the jar so excess water can escape
A jar-based method is one of the simple approaches described by NC State Extension. The cover should allow you to rinse the beans while also allowing water and air to pass through. Do not use an airtight lid during germination because the beans need effective drainage and airflow.
A sprouting tray or another container designed for drainage can also work, but the jar method is convenient for beginners because it makes the soak–rinse–drain process easy to follow.
Before You Start: Choose the Right Mung Beans
Choose whole beans sold for food or sprouting
For this method, choose whole, intact mung beans labeled for food use or specifically intended for sprouting. Nebraska Extension and Virginia Cooperative Extension provide guidance on selecting seeds for edible sprouting.
Some grocery-store mung beans may sprout, but you should not assume that every product is suitable. Check the labeling and avoid beans that appear treated, dyed, damaged, or intended only for planting.
Avoid treated or visibly damaged seed
Do not use garden seed that has been chemically treated with fungicides or insecticides for edible sprouts. Planting seed is not automatically suitable for eating after germination. Guidance from Nebraska Extension, Virginia Cooperative Extension, and Oregon State University supports avoiding treated seed for edible sprout production.
Before soaking, remove:
- Debris and foreign material
- Moldy beans
- Severely discolored beans
- Visibly damaged beans
- Beans with an unusual coating or odor
Sorting improves the starting quality of the batch, but it does not sterilize the beans or remove pathogens that may be present on or inside them.
What labels do—and do not—mean
An organic label describes how a product was produced or handled under organic standards. It does not prove that mung beans or the sprouts grown from them are free from harmful bacteria.
Food safety depends on more than a label. The seed itself can be a contamination source, and bacteria can multiply during sprouting.
How to Grow Mung Bean Sprouts Step by Step
1. Rinse and sort the beans
Place a modest amount of whole mung beans in the jar. Avoid filling the jar tightly because the beans will expand and eventually produce a much larger volume of sprouts.
Rinse the beans with clean water and sort through them. Remove visible debris, damaged beans, and anything that looks moldy or unusual.
This is a preparation step, not a pathogen-removal step. Rinsing does not guarantee that the beans are free from harmful bacteria.
2. Soak for 6–12 hours or overnight
Cover the beans generously with room-temperature water. Leave enough space for the beans to absorb water and expand.
A practical soaking range is approximately 6–12 hours, commonly overnight. Extension recommendations vary somewhat, so there is no need to treat one exact soaking time as universal. See the soaking guidance from NC State Extension, UF/IFAS Extension, and Nebraska Extension.
Once the initial soak is complete, move to the draining stage. Avoid leaving the beans submerged indefinitely.
3. Drain completely
Fit the jar with the mesh lid, cheesecloth, or another breathable cover. Pour out all of the soaking water.
Position the jar upside down or at an angle, with the opening facing downward or toward the lowest point, so excess water can escape. Place a bowl or tray underneath to catch drips.
Complete drainage is one of the most important parts of home sprouting. The beans should remain moist, but they should not sit in pooled or standing water. Poor drainage can reduce aeration and contribute to spoilage. Nebraska Extension and Oregon State University provide related guidance on managing moisture and drainage.
4. Rinse and drain two to four times daily
Rinse the beans with clean water approximately two to four times each day. Depending on your routine and household conditions, this may mean rinsing every 6–12 hours. Similar rinse-and-drain schedules are described by Nebraska Extension, NC State Extension, and Oregon State University.
For each rinse:
- Add clean water through the breathable cover.
- Gently move the beans so the water reaches the batch.
- Drain the jar fully.
- Return it to its angled position.
Always emphasize the final drainage step. Rinsing without draining thoroughly can leave the beans sitting in excess moisture.
The two-to-four-times-daily schedule is practical growing guidance for managing moisture and supporting germination. It is not a validated household sterilization method, and more frequent rinsing does not guarantee safer sprouts.
5. Keep the jar warm, dark, and ventilated
Place the jar in a warm household location away from direct sunlight. Approximately 70–80°F is a practical target range, although growth speed can vary with household temperature and the specific beans. NC State Extension, UF/IFAS Extension, and Nebraska Extension discuss warm, dark conditions for sprouting.
A dark location is useful if you want pale sprouts. Exposure to light can cause the developing shoots to turn green and may affect their texture or flavor. Darkness is a quality and appearance preference, not a food-safety control.
The jar should have airflow through its breathable cover and remain positioned for drainage. Avoid sealing the jar tightly or placing it where water cannot escape.
6. Harvest in approximately 3–7 days
Mung bean sprouts are often ready within about 3–7 days. The exact timing depends on:
- Temperature
- Seed quality and condition
- Rinse and drainage conditions
- The size and texture you prefer
Harvest when the roots and shoots have reached a useful size for you. There is no single maturity day or length that applies to every batch. The approximately 3–7 day range is consistent with guidance from NC State Extension, UF/IFAS Extension, Nebraska Extension, and Oregon State University.
Before harvesting, inspect the sprouts. A batch intended for use should not have visible mold, a sour or unpleasant odor, slimy surfaces, or unusual discoloration. These are discard signals, not problems to solve by rinsing.
How to Grow Thicker, Whiter Mung Bean Sprouts
If you prefer pale, relatively uniform sprouts, focus on the growing conditions rather than trying to force a particular result.
Keep the jar dark
Darkness helps limit greening. If the jar is exposed to bright light, the shoots may become green and may develop a different texture or flavor.
However, darkness does not make sprouts safer. A dark jar can still contain harmful bacteria if contamination was present on or inside the seed.
Avoid overcrowding
Start with a modest amount of beans so they have room to expand. Overcrowding can make it more difficult to rinse the beans evenly and drain the jar thoroughly.
As the beans swell and sprout, they should not be compressed into a dense, water-retaining mass.
Distribute the beans evenly
After rinsing, gently move the jar so the beans are distributed rather than packed into one heavy clump. Even distribution can improve airflow and help the batch develop more uniformly.
Prioritize drainage
Thorough drainage is more important than maintaining a constantly wet environment. The beans need moisture for germination, but they should not sit in water between rinses.
If water repeatedly collects in the bottom of the jar, change the angle of the jar or improve the draining setup.
Do not treat pressure as a safety measure
Some sprouting methods use light pressure or a clean weight to influence the shape of the sprouts. If you experiment with this, regard it only as an optional appearance or texture technique.
Pressure does not make sprouts safer, prevent contamination, or guarantee thicker sprouts.
How to Harvest, Rinse, and Store Mung Bean Sprouts
Harvest and give them a final rinse
When the sprouts reach the size you prefer, empty them from the jar. You can remove loose seed coats if desired.
Rinse the harvested sprouts and drain them well. The final rinse may remove loose hulls and debris, but it should not be described as a disinfection step.
Refrigerate promptly
Place the well-drained sprouts in a clean container and refrigerate them promptly at 40°F or below. See the FDA’s produce-safety guidance and UF/IFAS Extension’s sprout guidance for related storage and handling information.
Refrigeration does not eliminate the food-safety risk associated with raw sprouts.
Use homegrown sprouts promptly because storage life can vary with:
- Initial seed contamination
- Drainage
- Cleanliness
- Refrigerator temperature
- Container conditions
- How wet the sprouts remain
There is no universal shelf-life guarantee for every homegrown batch.
Know when to discard them
Discard the sprouts if they develop:
- A sour or unpleasant odor
- A slimy texture
- Visible mold
- Unusual discoloration
- Other signs of spoilage
Do not try to rescue a questionable batch by rinsing, trimming, or cooking it. Thorough cooking can reduce risk in a fresh batch, but it does not make spoiled food suitable to eat.
Are Homegrown Mung Bean Sprouts Safe to Eat Raw?
Why sprouts carry a food-safety risk
The conditions that help mung beans sprout—warmth, moisture, and time—can also support the growth of harmful bacteria.
If bacteria are present on or inside a seed, they may multiply as the seed germinates. This can happen even when the jar, water, and handling practices appear clean. The FDA discusses this risk in its guidance on selecting and serving produce safely.
Raw or lightly cooked sprouts may contain harmful bacteria, including pathogens associated with foodborne illness such as Salmonella, Listeria, and certain strains of E. coli. The FDA, CDC, and FoodSafety.gov provide food-safety guidance relevant to raw sprouts. This does not mean that every batch is contaminated, but it does mean that sprouting at home cannot guarantee a pathogen-free result.
Is homegrown safer than store-bought?
No. Homegrown sprouts are not automatically safer than commercial sprouts.
Growing at home gives you control over the jar, rinsing routine, and storage conditions, but it does not guarantee that the original seed was free from pathogens. Good sanitation, adequate drainage, and refrigeration are sensible handling practices, but they cannot guarantee safe raw sprouts.
It is useful to separate growing-quality practices from food-safety controls:
| Practice | What it can help with | What it cannot guarantee |
|---|---|---|
| Sorting damaged beans | Removes visibly poor-quality material | Does not remove invisible contamination |
| Rinsing | Manages moisture and loose debris | Does not sterilize the sprouts |
| Thorough drainage | Reduces standing water and supports aeration | Does not eliminate pathogens |
| Darkness | Helps produce pale sprouts | Does not improve microbiological safety |
| Refrigeration | Slows deterioration | Does not make raw sprouts risk-free |
| Thorough cooking | Reduces food-safety risk compared with eating sprouts raw | Does not salvage spoiled sprouts |
Who should avoid raw or lightly cooked sprouts?
People at higher risk of serious foodborne illness should avoid raw or lightly cooked sprouts. This includes:
- Pregnant people
- Young children
- Older adults
- People with weakened immune systems
The FDA, CDC, and FoodSafety.gov identify cooked sprouts as the safer choice for people in higher-risk groups. People outside these groups can also become ill from contaminated food, so raw sprouts are not risk-free for everyone else.
Is cooking safer?
Thorough cooking reduces food-safety risk compared with eating sprouts raw or lightly cooked. Follow a reliable food-safety method and make sure the sprouts are cooked thoroughly rather than only briefly warmed. The FDA’s guidance for people at higher risk of foodborne illness supports choosing cooked sprouts rather than raw or lightly cooked sprouts.
Cooking does not make a moldy, slimy, or foul-smelling batch suitable for eating. Spoiled sprouts should be discarded.
What home treatments should not be presented as guarantees?
Do not treat rinsing, vinegar, peroxide, bleach, boiling, or another household procedure as a guarantee that raw sprouts are safe or pathogen-free.
The FDA’s detailed seed-treatment guidance is directed primarily toward commercial sprout production. See the FDA guidance on reducing microbial hazards in seed for sprouting and its guidance for seeds used for sprouting. These documents should not automatically be converted into a do-it-yourself home treatment protocol. Household treatments may not eliminate microorganisms, and no treatment removes the need for careful handling and appropriate caution.
Troubleshooting Mung Bean Sprouts
The sprouts smell sour or unpleasant
Discard the batch. A sour or unpleasant odor is a spoilage warning, not a sign that the sprouts need another rinse.
For future batches, review whether the jar was overcrowded, whether it drained completely, and whether water remained pooled between rinses.
The sprouts are slimy
Discard slimy sprouts. Do not try to wash away the texture and continue using them.
For future batches, use less seed, improve the jar angle, and check that the cover permits adequate drainage and airflow. These changes may improve the next batch, but they cannot make a questionable current batch safe.
You see mold
Discard the entire batch rather than scraping off visible mold. Review seed quality, jar cleanliness, overcrowding, moisture, and drainage before trying again.
The beans are not sprouting
Slow or failed germination can have several possible causes, including:
- Unsuitable or treated seed
- Seed in poor condition
- Temperature outside the preferred range
- Beans drying out
- Poor drainage or moisture management
Seed suitability and condition, moisture, temperature, and drainage can all affect results, so no single cause should be assumed without considering the entire setup.
Use whole beans intended for food or sprouting, maintain moisture without leaving standing water, and keep the jar in a warm household location.
The sprouts are drying out
Check whether the beans are being rinsed regularly and whether the breathable cover is allowing water to reach the entire batch.
After each rinse, drain the jar thoroughly. The goal is evenly moist beans, not beans submerged in water.
The sprouts are turning green
Light exposure can cause the shoots to turn green. Move the jar to a darker location if you prefer pale sprouts.
Greening is primarily an appearance and quality issue in this context. It does not by itself prove that the sprouts are spoiled, and darkness does not make them safer.
The sprouts are thin or stringy
Review:
- Whether the jar is overcrowded
- How evenly the beans are distributed
- Whether the sprouts are receiving adequate moisture
- Whether drainage is complete
- Whether the jar is exposed to too much light
- Whether the temperature is appropriate for germination
No single adjustment guarantees thick sprouts. Home conditions may also produce different results from commercial sprouting systems.
The sprouts are sitting in standing water
Drain the jar and correct its angle or setup so excess water can escape. Nebraska Extension and Oregon State University provide related guidance on drainage and moisture management.
If the sprouts have already developed a sour odor, slime, mold, or unusual discoloration, discard them rather than trying to correct the problem.
Improving drainage helps future growing conditions, but it does not erase contamination that may already be present.
Frequently Asked Questions
Research & Further Reading
Food-safety sources
- FDA — Selecting and Serving Produce Safely
- FDA — Fruits, Veggies and Juices: Food Safety for Moms-to-Be
https://www.fda.gov/food/people-risk-foodborne-illness/fruits-veggies-and-juices-food-safety-moms-be
- CDC — Safer Food Choices for People With Weakened Immune Systems
- FDA — FDA Issues Final Guidance for Seeds Used for Sprouting
- FDA — Guidance for Industry: Reducing Microbial Food Safety Hazards in the Production of Seed for Sprouting
- FoodSafety.gov — People at Risk of Food Poisoning
Home-sprouting and horticulture sources
- NC State Extension — Bean Sprouts and Other Vegetable Seed Sprouts
- UF/IFAS Extension — Bean Sprouts and Other Vegetable Seed Sprouts
- Nebraska Extension — Growing Edible Sprouts at Home
- Oregon State University — Sprout Production
- Virginia Cooperative Extension — Sprouting Seeds for Food
- Penn State Extension — What You Should Know About Sprouts
Company information
- Andi’s Way — Organic Mung Beans for Sprouting
This Andi’s Way page is a company and product source, not scientific or food-safety evidence. Product availability and current product details should be verified before relying on them.
Related guides
Sunflower Sprouts vs. Sunflower Microgreens: What’s the Difference?
Learn how sunflower sprouts and sunflower microgreens differ in growth stage, harvest method, texture, uses, and raw-food safety considerations.
13 min read
Best Microgreens for Beginners: Radish, Broccoli, Pea, or Sunflower?
Compare radish, broccoli, pea, and sunflower microgreens by seed prep, harvest time, flavor, and beginner-friendliness to choose your first tray.
10 min read
Speckled Pea Seeds for Microgreens: Why Growers Use Them
Learn why growers use speckled pea seeds for pea shoots and microgreens, what to check before buying, and why seed quality matters more than the label alone.
13 min read
Stay in the loop
New guides, when they publish
An occasional email when a new guide goes live. No spam.
Your email is stored privately for future guide updates. No emails are being sent yet. Privacy policy